Morpho UV printer jigs: a free tool that draws them, no CAD needed.
The open jig system is the best reason to want a Morpho, and the CAD is the reason to dread it. Our free tool draws the jig instead - 138 sizes, both beds.
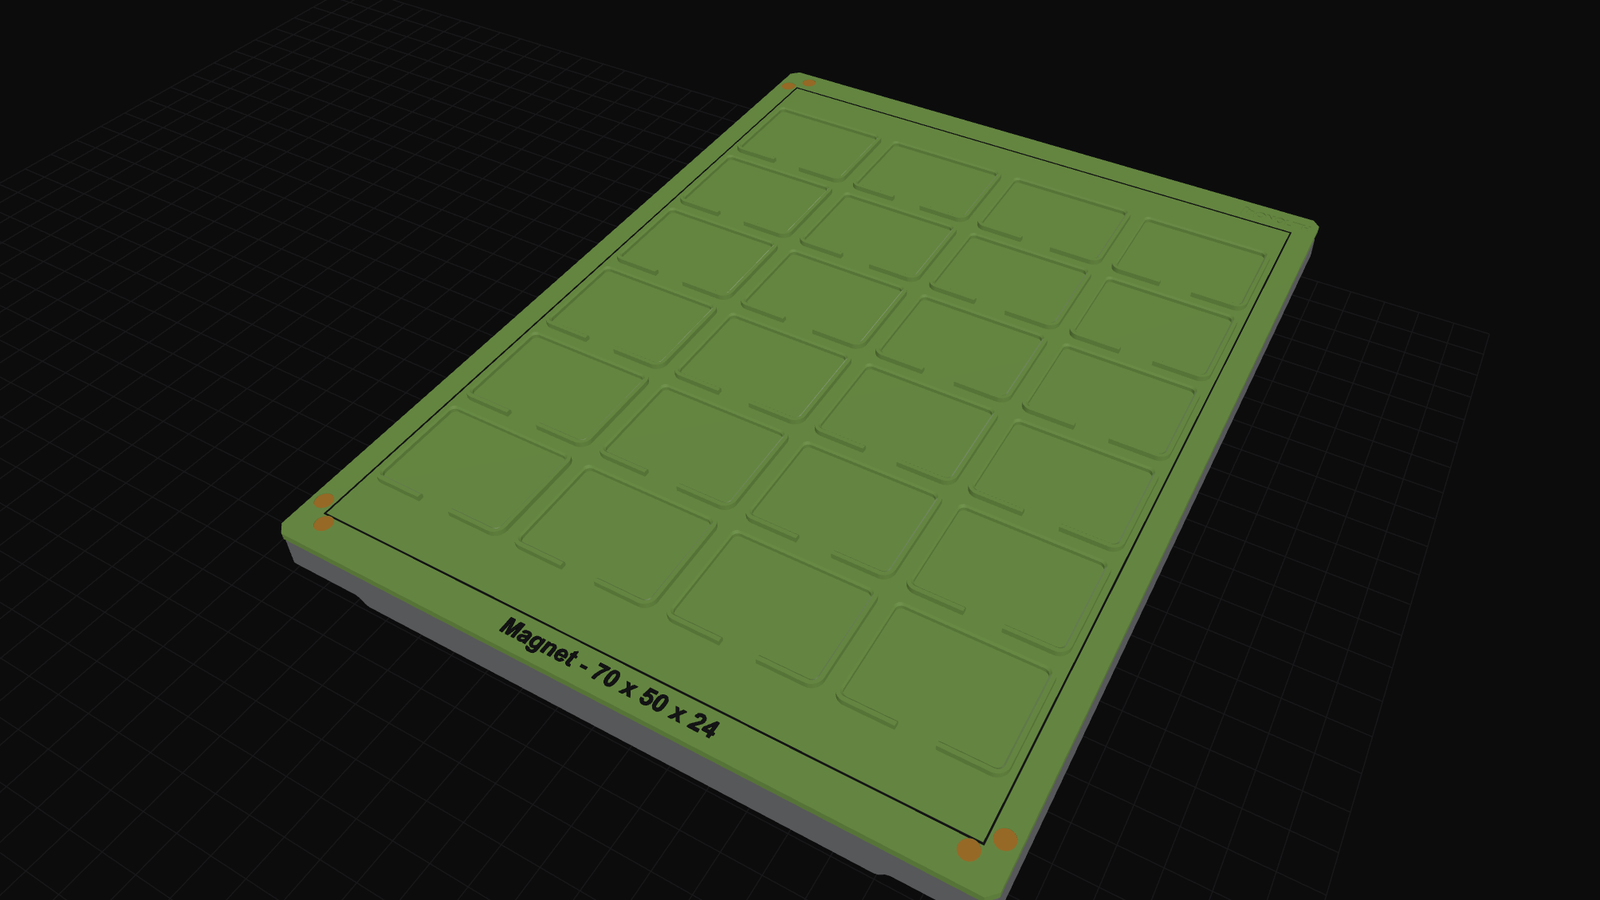
Morpho's Kickstarter went live on 20 August 2026, and the thing that separates their desktop UV printer from the rest of the flatbeds isn't the head or the ink. It's the open jig system. You won't be stuck with the fixtures the manufacturer sells: you can design your own, register it in Morpho Studio, and print onto whatever you like, arranged however the job wants it.
That's the part that pays for itself if you sell anything in batches. It's also the part that quietly assumes you'll open FreeCAD, import an STP template and boolean a pocket out of it.
So we built the Morpho Jig Maker, which does the same job with sliders. Pick your platform, say what you're printing on and how many you want, and it lays the pockets out inside the printable area and builds the jig around them. Free, runs in your browser, nothing uploaded, no sign-up.
What it'll hold
There are 138 sizes in the library across eleven categories, so most jobs start with a preset rather than a tape measure.
Cards has business cards in five regional standards - UK and European at 85 by 55mm, US 89 by 51mm, Japanese 91 by 55mm, Oceania 90 by 55mm, and the 90 by 54mm used across China and much of Asia - plus square and slim cuts, trading cards from mini through bridge and tarot to jumbo, postcards, folded greeting cards in A6, A5, DL and square, and seven bookmark sizes. Paper and prints runs A4 down to A7 with DL, US Letter and two squares.
Badges covers the seven round button sizes from 25 to 75mm, four squares, and two name-badge blanks. Coasters and magnets does 90, 95 and 100mm rounds, beer mats at 93 and 107mm, square coasters, and fridge magnets from a 25mm round up to 70 by 50mm, card and photo sizes included.
Phone cases lists the current iPhone, Galaxy and Pixel bodies grouped by size, with generic small, medium and large for anything not named. Earbud charging cases come in three shapes. Dice covers d6 from 12 to 25mm plus a full polyhedral set. Keycaps run 1u to 2.75u with 6.25u and 7u spacebars. Coins go 20 to 70mm and 1.5 to 2.5 inches.
Sports is fourteen balls - golf, table tennis, squash, snooker, pool, racquetball, lacrosse, tennis, cricket, field hockey, baseball, pickleball and softball in both sizes - plus an ice hockey puck. Stationery holds ten pens and markers lying down, from a slim barrel to a whiteboard marker.
Nothing there that fits? Give it a width, a depth and a height and it builds around that instead. The library is a starting point rather than a limit, which is what you want for a tin, a lighter, a slate coaster or whatever your customers keep asking for.
Setting one up
Start with the platform. The A4 base plate gives you 330 by 220mm of printable area, the A3 printbed 330 by 420mm.
On the A4 you print three things, and only one of them twice. A base plate and a grid tray go on the machine and stay there. The blocks that drop into the tray are the part you make per job.
The tray is a grid of 50mm cells, six across and four up. A block takes whole cells - one, four, or the lot if the job wants it.
Say how big you want the block and it fills with as many of the object as go in. Sixteen 12mm dice in a 100mm square; one business card in that same square, because a card is most of it. Set the rows and columns by hand if the fill isn't what you're after.
The readout keeps up as you go: pocket size, how many you're getting, the edge walls left over, finished thickness, and roughly what it'll weigh in filament at 20% infill.
The bits it works out for you
Pocket depth comes off the object's real height rather than a guess. A business card gets about a millimetre, enough to stop it sliding and shallow enough to lift out again. A golf ball gets a seat deliberately smaller than the ball, so it sits on the rim with its top clear to print on. A pen lies in a round-bottomed trough half its barrel deep so it can't roll.
The pockets stand on a thin plate with a collar raised round each one, so depth only exists where an object needs it. That keeps a deep pocket from dragging the whole jig up towards the printer's height limit, and it saves a fair chunk of filament: on a golf ball jig, about two thirds against a solid slab.

Clearance sits at 0.3mm by default, mid-range for the 0.2 to 0.4mm Morpho suggest for PLA. Finger notches cut into the pocket wall so you can get a printed card back out, front, back, sides or all four. Lead-in chamfers break the rim so an object drops in instead of catching on it. There's a push-out hole through the floor if you'd rather pop things up from underneath, and square pockets get a relief at each corner, because a printed inside corner is never sharp and a square object would otherwise ride up on the build-up.
How it stays put
The A4 plate has eleven magnets set flush in its surface, and they'll hold a jig down all day. What they won't do is put it back in the same place: the pull is straight down, so everything resisting a sideways nudge is friction.
Morpho's own demo jig doesn't rely on them, and neither does this. Four legs on the underside drop into four openings in the platform - two shapes, not four the same, and not symmetric front to back, which is what stops a jig going on backwards.
The part that does the work is the notch. Only the front face of each leg is cut back, so the platform's catches all push the same way and drive every leg against the far wall of its opening. That's where the repeatability comes from, rather than the fit of the leg, which has a couple of millimetres of slack in every direction.
The legs come as part of the base, or as separate parts screwed to it. Their bores are M5 and M6 tapping sizes, so the separate ones are tapped with real threads and take a countersunk screw into the base's top face, hidden under the tray. Worth it if you'd rather reprint a worn leg than a whole plate.
The A3 printbed works differently. It has no magnets and locates on 4mm holes near the corners, so the tool bores a hole straight through the jig over each one and countersinks the top. A printed pin drops in from above and finishes below the surface: nothing to glue, nothing proud for the height probe to catch. Only the top 3mm of the bed's hole actually locates, so the pins are short by design.
Both beds, in numbers
The A4 base plate is roughly 350 by 309mm with a 2.7mm chamfer off each corner, 330 by 220mm of that printable, and 168mm of headroom including the jig. The A3 printbed is about 356 by 456mm, chamfered 4.7mm, printable 330 by 420mm, with headroom down to 133mm because the bed sits higher in the machine. Design a tall jig against the A4's figure and it'll fail the moment you switch beds.
Cover most of the bed and you'll cover some of the printer's own recognition marks with it. Morpho account for that: where a jig hides them you position with Custom Jig mode or Snapshot mode instead. Register the jig in Studio under Library, then Jig, then Add Jig, and draw the printable region so it's there next time. The A3 printbed doesn't support Smart Alignment at all, so Snapshot is the method there.
Bigger than your printer? Split it
The base is 320 by 220mm and the tray not much under it, sized so a Bambu Lab H2D takes it in one piece. There is 5mm across to spare on the H2D's 325 by 320mm bed.
Most desktop printers won't take it whole. Give it the short side of your bed and both parts come apart into the fewest pieces that fit - two each at 250mm. The base's seams carry interlocking teeth that pull the halves into line; the tray's run down cell lines so no cell is ever halved, and those need no teeth, because the base's walls and pins already hold both halves.
A full A3 jig splits the same way, into a grid of blocks that each fit your bed. The seams snap to the gaps between pockets so a cut never crosses one, and the joins carry interlocking teeth.

Tooth depth is capped by the real distance from the seam to the nearest pocket wall rather than by whatever you asked for, so ask for 5mm in a jig with 12mm between pockets and you'll get less. The collar round each pocket is what a tooth meets first. You can preview any block on its own before committing to the set.
The error nobody mentions
A 320mm print comes out a third to a half of a percent small. That's a millimetre and a half across the plate, more than every clearance in the design put together. It costs nothing in repeatability, because it's the same every time, but it pulls every cell towards the middle - so a block in the far column prints about a millimetre from where the model says it will.
Print the tray, measure it across both ways, and type in what you actually got. Everything is then drawn that much oversize, so the print lands on size and the cells land where the machine expects them.
Labels, marks and what comes out
Every jig carries a label engraved into it, filled in for you as something like Business card - UK / Europe 85 x 55mm, and editable if you'd rather write your own. It goes wherever the text can be biggest: the border, the front wall, or the floor of the pocket where an object fills the block and there's no border left. It wraps to two lines when that reads better. Print it in a second colour and it comes out as its own body in the 3MF so the slicer swaps filament for it.
On a full-bed jig there's a thin line marking where the printable area stops, in its own colour as well, so that boundary lives on the jig instead of only on screen.
Downloads are STL for printing, 3MF when you want the label in colour or a split part as separate objects, STEP if you'd rather carry on in CAD, and SVG or DXF top views for cutting a flat positioning frame on a laser. They're switched off for now, until the first jigs come back from a real machine. Everything else works: design it, preview it, and share a link that reopens it exactly, custom sizes and all, with nothing stored at our end.
What it means for you
Nobody has a Morpho on the bench yet, ours included, so the tool is built from the dimensions Morpho publish and the files they distribute. That's why it carries an In Test badge, and why the downloads stay shut until the first jigs come back from a machine. When they open, the sensible move is still a paper test on your first jig: lay white paper where the object sits, print a crosshair, check it lands square.
If you've put a deposit down and you're planning to sell anything in batches, the jigs are the part worth having sorted before the machine turns up. Print the base and the tray once. After that it's a block per job, and the block is the only thing you ever print again.
Sources
Making something of your own?
Tell us the brief →